
CLASSROOM VALENTINE MAILBOX
- Jan 1, 2023
- 3 min read
Updated: Jan 26, 2023
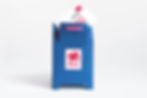
Delivering my Valentines to my classmates was just about as exciting as handing out my birthday cupcakes. I remember practicing before writing each name on my carefully selected cards, wanting them to be perfect. The night before I would arrange the cards alphabetically, then in order of seating, and back again, full of excitement. Most certainly I would have loved to have a postal box for collecting all my cards. Just like this one. You can make your own in the colors of your choice—just print the PDF file onto colored cardstock and You've Got Mail!

CREATE A MAILBOX FOR CLASSROOM VALENTINES
MATERIALS
Paper
Cardstock in at least two colors —we sourced ours from Paper Source
Heavy-weight paper for the label (matte photo paper works best!)
Cutting Tools
Scissors and/or craft knife
Scoring Tools
Adhesive, choose from below
INSTRUCTIONS

1. Download the Valentine Mailbox PDF
2. Print the mailbox sheets onto colored cardstock. Print the label onto heavy-weight paper. Ensure that you are printing at 100% scale.
3. Score all dashed lines and cut out all the pieces. Mailbox Front and Mailbox Rear each have slits that must be cut with a craft knife. If you need a tutorial on scoring, please visit our scoring section.
4. On each piece, bend along the creases to loosen the folds.
5. Attach Tabs A and B on Mailbox Top to Sides A and B on Mailbox Front.

6. Attach Tab C on Mailbox Chute to Side C on Mailbox Front.
7. Affix all the tabs along Tabs D and E on Mailbox Chute to Sides D and E on Mailbox Front. I find the easiest way accomplish this assembly is by adding a liberal line of glue along Sides D and E. After pulling back all the middle tabs, I secure the end tabs, allowing them to set a bit. Then I press the middle tabs into place.

8. Slide the tabs on Chute Handle through the two slits on Mailbox Front and secure.
9. Glue down Chute Cover onto the inside of the chute. Refrain from using glue to secure as the paper can wrinkle. It is better to use paper cement or double-sided tape.

10. Attach the front side (unprinted) of Tabs F and G on Mailbox Front to Sides F and G on Mailbox Side 1.
11. Affix the front side (unprinted) of Tabs H and I on Mailbox Front to Sides H and I on Mailbox Side 2.

12. Attach the front side (unprinted) of Tab J on Mailbox Bottom to Side J on Mailbox Front.
13. Next affix the front side (unprinted) of Tab K on Mailbox Bottom to Side K on Mailbox Side 2.
14. Then secure the front side (unprinted) of Tab L on Mailbox Bottom to Side L on Mailbox Side 1.

15. Slide the tabs on Door Handle through the two slits on Mailbox Back and secure.
16. Glue down the Door Cover onto the inside of the back door. Again it is important to use an adhesive that won't wrinkle or warp your paper—try paper cement or double-sided tape.

17. Affix the front side (unprinted) of Tabs M and N on Mailbox Back to Sides M and N on Mailbox Side 1.
18. Open the back door and pull Tab Q on Mailbox Bottom back, then secure the front side (unprinted) of Tabs O and P on Mailbox Back to Sides O and P on Mailbox Side 2. Release Tab Q and press into Side Q on Mailbox Back.

19. Turn the box over and wrap the unattached strips around to form feet for the mailbox. Secure Tabs R, S, T, and U.

The next two steps are the trickiest. I found that using craft glue and running a liberal line along the edge of Sides W and X on Mailbox Top set up the best assembly technique.
20. Open the door and chute. Reach inside and pull back the tabs along Tabs W and X. Attach Tab V on Mailbox Top to Side V on Mailbox Back.
21. Acting quickly, reach inside and push the tabs along Tab W into place along Side W. Repeat for the tabs along Tab X.

22. To finish, simply attach the label to the front of the box.


